Juniper SRX Firewall Initial Configuration
Juniper SRX is the next generation firewall designed to provides high-speed, highly effective security services—even with multiple services enabled. The firewall released with a vast range of integrated security features suitable for securing medium to large scale enterprise Data Centers. Juniper has Virtual version vSRX focusing on security of cloud infrastructure.
The following steps describe the basic configuration settings of Juniper SRX Firewall.
We will be focusing on interface configuration, zone configuration and policy configuration
Following are the topics discussing over here.
1. Initialising SRX Firewall
2. Login to the firewall using console or GUI.
3. Configuring basic settings.
4. Configure interfaces.
5. Configure Zones and zone properties.
6. Configure firewall policies.
1. Initialising SRX Firewall and Login to the firewall
- Unpack and power on the device.
- Plug one end of the CAT-5e (Ethernet cable) supplied with your firewall into the RJ-45 to DB-9 serial port adapter supplied with your firewall
- Plug the RJ-45 to DB-9 serial port adapter into the serial port on the PC
- Connect the other end of the Ethernet cable to the console port on the services gateway.
- Open Hyper terminal and select COM1 with following settings
Port Settings Value
Bits per second : 9600
Data bits : 8
Parity : None
Stop bits : 1
Flow control : None
- Log in as the user root. No password is required at initial connection, but you must assign a root password before committing any configuration settings
2. Configuring basic settings
root# cli
root@>
Enter configuration mode:
root@>configure
[edit]
root@#
New password: password
Retype new password: password
Set admin password
[edit]
root@# set system login user admin class super-user authentication plain-text-password
Set System host name
root# set system hostname
Set DNS Servers
root# set system name-server 8.8.8.8
[edit]
root# set system name-server 8.8.4.4
Commit the configuration and login with admin user.
root@# commit
3. Configure traffic interfaces
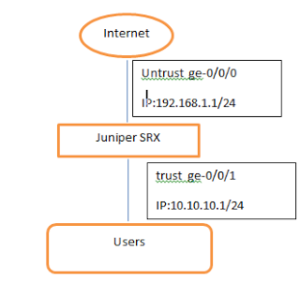
We will use the following scenario to configure interfaces and zones.
Assign IP address for untrust interface
[edit]
root#set interface ge-0/0/0 unit 0 family inet address 192.168.1.1/24
Assign IP address for trust interface
[edit]
root#set interface ge-0/0/1 unit 0 family inet address 10.10.10.1/24
Configure default route
[edit]
admin@# set routing-options static route 0.0.0.0/0 next-hop gateway
Enable ssh and https for firewall management on trust interface
[edit]
root# set system services ssh
[edit]
root# set security zones security-zone trust host-inbound-traffic system-services ssh
[edit]
root# set security zones security-zone trust host-inbound-traffic system-services http
[edit]
[edit]
root# set security zones security-zone trust host-inbound-traffic system-services https
5. Configure Firewall policy
Create a firewall policy to enable all the traffic from trust zone to internet.
[edit]
admin@# set security policies from-zone trust to-zone untrust policy policy-name match source-address any
destination-address any application any
admin@# set security policies from-zone trust to-zone untrust policy policy-name then permit
Commit the configuration to active on the gateway.
[edit]
admin@# commit
commitcomplete

